Offering your website visitors the ability to communicate with you on their terms is critical. One of the ways customers love to enquire nowadays is using live chat or direct messages (think Facebook and Instagram). You now have the possibility to install Facebook Messenger Chat on your website.
This article will show you how simple it is to do.
Connecting your Facebook Messenger to your website
There are a number of ways to do this. For this exercise, we will show you how to get the code from Facebook which you can use on any website platform and we will then show you how to use the official Facebook Chat plugin on WordPress.
If you intend to set up Facebook Messenger on Wix or Squarespace follow these instructions for Wix and these for Squarespace.
Golden rule
We always recommend testing any new plugin on what is called a staging site (that is a copy of your website that you use for testing purposes before you roll out changes on your live site.). However, not many DIY small businesses have a staging site so we’ve given you instructions below to mitigate any problems when doing this one a live website
Prior to doing anything on your live website (such as WordPress), you will need to ensure:
- You have a backup system in place (if you’re self-hosted, e.g. WordPress.org, unlike systems like Wix who are not self-hosted and that you are ‘renting’)
- You take a current backup
- You know how to restore the backup if anything goes wrong
- You have the login details to your hosting (Cpanel or other)
- You have the login to your files (FTP)
- You have the number of your web developer handy (and hopefully you’re on good terms)
As you can see in the video, installing the plugin takes a few seconds. If you’re not familiar with any of the above it may be best to pay your web developer to ensure this is all done properly. If you have a support plan in place, all the backups should be done anyway and the installation cost will be minimal.
Instructions
- Read the Facebook help page about adding live chat to your website
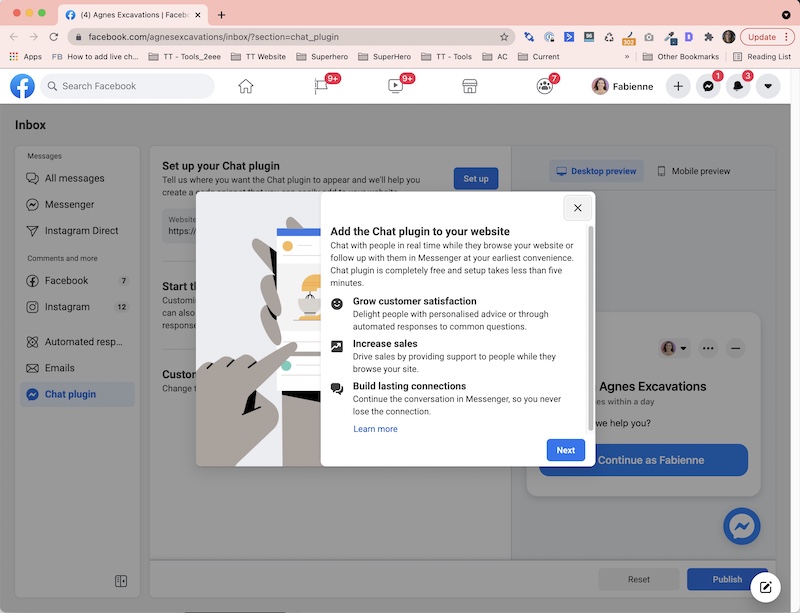
- Click the link on the Facebook page as per the video or head over to your Facebook Inbox and look for the live chat section as per the screenshot below:

- Follow the prompts
- If you’re on WordPress refer to my video that explains what plugin you’ll need (and double-check you’ve got all the backup bullet points listed above ticked) to install and configure the Facebook Chat Plugin. If you’re on another system check if a plugin exists or go the old school way using the code provided by Facebook
- Check the front end of your website (clean your browser cache if needs be, instructions on how to do this for Mac here and for Windows here)
- Then give it a good test. If you run into issues head over to our Facebook Group for help or comment below.


